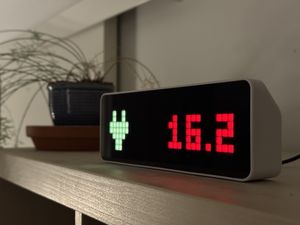
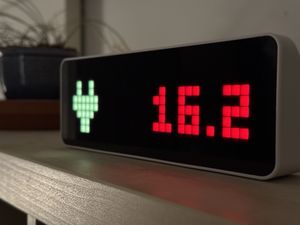
Showing spot electricity prices on a Ulanzi clock using ESPHome
Knowing the price helps keep our electricity use at a sustainable level. This approach is extremely flexible and doesn't require MQTT.

Why I did it
Where we live, the price of electricity changes every hour. There's an auction between different producers every day. Based on the auction the "exchange price" each hour for the next day is known from around 2PM.
We could pay more for a guaranteed, fixed price, but we chose not to. Our usage is usually quite low and we can adjust our plans, like what time we make dinner, if the price is high. Paying, and watching, the hourly price is a good way to keep our usage at a sustainable level for the supply.
Earlier, we had the price shown in the Home Assistant app, but it's not always easy to remember to check it. I wanted to try making it visible when we are in the kitchen and living space, where most of the energy is consumed.
In this project, I got the price to pop up on the LED panel of a Ulanzi clock, using Home Assistant and ESPHome. If the price is low, it behaves like a clock and only shows the time. If the price exceeds a pre-defined limit, the electricity price appears.
Ingredients
- Ulanzi TC001 Smart Pixel Clock
- ESPHome - I have it running as an add-on in Home Assistant OS, but any method should work
Method
Get the price into Home Assistant
I did this a while ago. The starting point was installing HACS. HACS enables the easy installation and updating of custom components. The website has a good step-by-step guide to getting started with HACS.
With HACS installed, I could install the Nordpool custom component. The component is then configured from the user interface. The electricity contract includes a breakdown of the margin, fees and VAT rate. A few months ago the VAT rate changed. It wasn't easy to update these options then, so I recommend not using the built-in VAT calculation. Instead, I now use Home Assistant in "number helpers" for the margin and VAT rate. Then the "additional fees" value will be something like:
{{ (current_price * states('input_number.electricity_vat_rate') | float(0)) + states('input_number.electricity_margin_cents') | float(0) }}I ended up with a Home Assistant sensor showing the current price. It has attributes for hourly prices and other statistics, but they're not used here.
Flash the clock
The clock contains an ESP32-based processor. I can connect to it with a USB-C cable to write firmware to it. This replaces the stock firmware the clock comes with, but unlocks a great deal of power.
I use ESPHome to compile and install this firmware. The ESPHome website explains how to get started.
My Home Assistant instance doesn't have an SSL certificate on the local network, so the easiest way to get started was using ESPHome Web. This writes an empty ESPHome image onto the device. After this, I could set your wi-fi credentials, then "adopt" the empty device into the local ESPHome. Once the wi-fi credentials are set, further updates happen over wi-fi.
When I flashed the image, the clock made a continuous beep. This is annoying, but it doesn't seem possible to stop it until I was able to write my own configuration. Muffling the noise with some tape helped, as did moving the clock to another room.
Write the code
I'm not going to explain every intricacy of using ESPHome here. I suggest starting with the ESPHome documentation if you're new to it and want to copy this.
The first few lines written were to stop the constant beeping. Adding this to the configuration file in ESPHome, then recompiling and flashing the software helped:
# Fix the beeping
output:
  - platform: gpio
    pin:
      number: GPIO15
      ignore_strapping_warning: true
    id: buzzer_pin
Next, it was time to think about the architecture. I looked at ready-to-install solutions, like ehmtx. I decided not to go with this, as it was restrictive, and included features I didn't need. Their code did help me understand things like pin numbers, though.
First, I added the "light" component, which has 256 addressable LEDs. This would allow me to write the display next.
light:
  - platform: neopixelbus
    id: ulanzi_leds
    type: GRB
    internal: true
    variant: WS2812
    pin: GPIO32
    num_leds: 256
    color_correct: [30%, 30%, 30%]
    gamma_correct: 2.0
    restore_mode: ALWAYS_OFF
Then, adding a display component, which references the light, allowed me to write what appears on the pages.
display:
  - platform: addressable_light
    id: ulanzi_display
    addressable_light_id: ulanzi_leds
    width: 32
    height: 8
    pixel_mapper: |-
      if (y % 2 == 0) {
        return (y * 32) + x;
      }
      return (y * 32) + (31 - x);
    rotation: 0°
    update_interval: 16ms
    auto_clear_enabled: true
I wrote pages using ESPHome's display engine. This was a big challenge, as the resolution is only 8x32 pixels. I went for MatrixChunky6 and MatrixChunky8, MIT-licensed fonts I found on GitHub. It's just a case of copying the BDF version of the font into Home Assistant's config/esphome/ directory, and adding some more YAML:
font:
  - file: "fonts/MatrixChunky6.bdf"
    id: chunky6
    glyphs: "0123456789."
  - file: "fonts/MatrixChunky8.bdf"
    id: chunky8
    glyphs: "0123456789."
My wife quickly created an 8x8 pixel icon. I tried using the Material Design icons, which are already integrated into Home Assistant and ESPHome, but these all looked terrible at this size. My wife's icon was designed at this size, so looked pretty good:
Again, it was just a case of uploading the file (the original was a PNG) and adding a bit more to the YAML:
image:
  - file: 'custom_icons/plug.png'
    id: plug_icon
    resize: 10x8
    type: BINARY
Setting type: BINARY here was nice, as it allowed me to re-color the image later.
Now it was time to write the actual views. This used ESPHome's "pages" concept. One screen only includes the time, and another only includes the electricity price. The following code is added so that pages is a key under the existing display item.
    pages:
      - id: current_time
        lambda: |-
            auto pale_yellow = Color(255, 255, 127);
            it.strftime(16, 0, id(chunky8), pale_yellow, TextAlign::TOP_CENTER, "%H.%M", id(ha_time).now());
      - id: electricity_price
        lambda: |-
            auto red = Color(255, 0, 0);
            auto yellow = Color(255, 255, 0);
            it.image(0, 0, id(plug_icon), yellow);
            it.printf(32, 2, id(chunky6), red, TextAlign::TOP_RIGHT, "%.1f", id(current_electricity_price).state);
You might have noticed the references to ha_time and current_electricity_price. These need to be fetched from the Home Assistant instance on the local network:
time:
  - platform: homeassistant
    id: ha_time

sensor:
  - platform: homeassistant
    name: "Electricity price"
    entity_id: sensor.nordpool_kwh_fi_eur_3_10_0
    id: current_electricity_price
The entity_id he is copied from Home Assistant, so yours will probably look different.
Next, I added a switch. This switch allows me to swap from only displaying the time to displaying both the time and electricity price. The key detail about this switch is that it's exposed to Home Assistant. This means I can toggle it or write automations to toggle it automatically.
switch:
  - platform: template
    name: Show electricity price
    id: electricity_price_enabled
    optimistic: True
    restore_mode: RESTORE_DEFAULT_OFF
    entity_category: config
    icon: mdi:currency-eur
Then, I used this switch value to set the on_page_change options of the display component I created earlier.
    on_page_change:
      - to: electricity_price
        then:
          - if:
              condition:
                switch.is_off: electricity_price_enabled
              then:
                - display.page.show_next: ulanzi_display
                - component.update: ulanzi_display
This just tells ESPHome that when the page changes to the electricity price, if the "show electricity price" switch is off, then go to the next page. At this point, there's only one other page, but writing it this way means that it's possible to add more pages in the future.
I also set the view to go to the next page automatically every 15 seconds. If the switch is off, then when it goes onto the electricity_price page, it will immediately call display.page.show_next, meaning that we only see the clock (and not even a moment of the other page).
interval:
  - interval: 15s
    then:
      - display.page.show_next: ulanzi_display
      - component.update: ulanzi_display
Finally, I wrote the Home Assistant automation to turn this switch on when the price is high. I set a custom threshold as a fixed value.
alias: "Living Room Clock: Show electricity price based on value"
triggers:
  - trigger: numeric_state
    entity_id:
      - sensor.nordpool_kwh_fi_eur_3_10_0
    above: 8
conditions: []
actions:
  - action: switch.turn_on
    target:
      entity_id: switch.esphome_web_2d6341_show_electricity_price
mode: single
I also needed the inverse - to make the electricity price disappear when the price dropped low enough.
alias: "Living Room Clock: Hide electricity price when normal"
description: ""
triggers:
  - trigger: numeric_state
    entity_id:
      - sensor.nordpool_kwh_fi_eur_3_10_0
    below: 8
conditions: []
actions:
  - action: switch.turn_off
    metadata: {}
    data: {}
    target:
      entity_id: switch.esphome_web_2d7734_show_electricity_price
mode: single
Now the clock, in a highly visible spot at home, shows the electricity price whenever it is over 8 cents.
